Finished: a winter table runner

fullsizerender

dsc_0001

dsc_0002

dsc_0003

dsc_0004

dsc_0005

dsc_0006

dsc_0007

dsc_0008

dsc_0009


It all started with a visit to St. Louis last summer to stay with my friend, Sandy. After catching up on our lives and other news, she posed what I thought was an innocent question, but turned out to be anything but.

“So, have you been doing any quilting lately?” she asked.

“Yes, I just finished a large quilt for my bed,” I replied, not seeing the “Danger, Will Robinson” signs screaming all around me in flashing neon.

“Great! I want you to make a table runner out of this holiday fabric I have for Vee (her daughter),” said Sandy. “She wants one, and I hate to quilt. I’ve got the fabric right here. It shouldn’t take long at all.”

It was game over at that point. She had me, and there was no getting out of it. Since I was a guest in her home, I could hardly refuse, especially when I couldn’t come up with a good reason fast enough after saying I’d just finished something.

Sandy didn’t give me any direction other than to make it modern in style. So far, so good. But she only gave me four pieces of fabric, two of which were practically the same, and I was determined to make something that I could finish quickly using only those four.

Enter Pinterest. I remembered  seeing a number of holiday quilts that used strips and half-square triangles to create blocks that looked like wrapped presents. I then went to InDesign and drew the blocks so I could determine the best proportions, ones that I could use with my Accuquilt Go! Cutter to speed things even further. Each present block finishes at 9×12 inches. The strips are 1 inch finished and the half-square triangles are 2 inches finished.

(If you’re looking at the picture up top, you’ll have to decide which of the long strips you’ll do in one piece and which you’ll have to cut. I realized that once I started piecing!)

The blocks came together pretty quickly, which I followed up with some basic stipplin after outlining the ribbon and bow. Then I used the alternate striped print for the binding, which is my favorite part of the whole thing.

I’ll admit, I grumbled a bit while working on this. But, the good news is Vee loved the tablerunner, and I got a great design for a runner of my own.

xoxo,
Sandra

Finished: projects from a whirlwind year

DSC_0031

DSC_0032

DSC_0035

DSC_0033

DSC_0029

DSC_0030

DSC_0026

With everything going on last year, it seems I didn’t get around to posting a couple of projects I finished last year. Better late than never, I say, so here they are from the top:

First, my finished cover for my Quilter’s Planner 2016. When you purchased the planner, you received instructions for how to make a quilted cover. I decided to to for a scrappy look with some fabric from one of my very first quilts. I didn’t put the zippered pocket on the cover because to be completely honest, I haven’t gotten over my fear of zippers, but hope to conquer that sometime soon, and because I just didn’t think I’d use it, so why put myself through the trouble. I actually like the flat look, and it’s nice not to have to break up the angel fabric at a point where it was interesting. Needless to say, that’s the block I designed (complete with tutorial) on the open page in June.

Next up, two pillowcases for the daughters of some good friends. The first, black and white graphic with a pop of red on the inside. The second features fabric from a pen pal in Australia. How can you not love the duck-billed platypuses and the roos?

After finishing the beast I’m taking a break from quilting and have started an Orlane shawl as my lunchtime knitting project. Hopefully I’ll have a finish on that for you soon, but here’s a sneak peak:

img_0248

xoxo,

Sandra

Finished: Napoleon plus-sign quilt and some lessons learned

dsc_0101

dsc_0116

dsc_0120

dsc_0109

dsc_0112

dsc_0110

dsc_0113

dsc_0111

dsc_0108

dsc_0117

dsc_0115
dsc_0118

dsc_0105

dsc_0119

dsc_0122

I finished this quilt — at long last — a few weeks ago, but for a variety of reasons wasn’t able to get photos until last Sunday. A drained battery led to a long nap, so I didn’t take these until late afternoon, catching the golden-hour light photographers love. I can see why they do. Even with my limited skills and the fact that I shot in a somewhat somnambulant state, the colors in these photos are probably the most accurate I’ve ever gotten with Lola (my Nikon D3200). I still need to work on my compositional skills, but hey, one thing at a time.

After 10-plus years of quilting, this is the first one I’ve ever made that was large enough for my queen-sized bed. The drop from the top of the mattress to the frame is long, and any quilt has to be at least 108-inches wide, before washing, to cover everything. Each block of the plus signs is six inches finished — a wonderful size for showing off large scale prints and leaving room for plenty of variety.

Since its completion, I’ve washed the quilt once, and while the shrinkage was minimal, the red dye ran, even though I used three color-catchers. Thankfully, the color ran pretty evenly, and only on the black/tan bird toile, turning it kind of a mauve color. I prefer the original tan, but at least it doesn’t look too out of place. Maybe it will come out with future washings. The experience has definitely inched me closer to the pre-wash club.

Though it’s far from perfect, and it took forever, I love how the straight-line quilting turned out. So clean and simple, and a great choice for a such a busy look. But here’s the thing. While I’m very happy to have a quilt that fits my bed and certainly glad to have another finish, overall, I’m not really that keen on this quilt.  Oh, don’t get me wrong, I looove me some plus-sign quilts, whether they appear stacked together like this one, or with each plus surrounded by a background. And I do think the individual fabrics here are quite lovely on their own. But I had my doubts about this project from the start, and that definitely wasn’t a good sign.

The problem is, my taste has just changed too much since I bought this fabric more than a decade ago. With no solids to give the eye a rest, the quilt is too busy for me, and I’m tired of the jewel-toned color scheme. My style now is much more contemporary, bold and graphic, but you’d never know that looking at this quilt. In fact, I’m not sure you could tell that about most of what I’ve made and posted here.

In the past year, as I’ve dealt with moving to a new state, starting a new job, selling two houses and buying another, and getting involved in other activities, I’ve given a lot of thought to how I want to use the limited time and interest I have in making things. From now on, unless I really love the fabric/yarn/pattern/floss/combination/etc., I’m not going to make it, even if it means selling, donating or throwing things away mid-project. The rest of my life is too short to spend time on things I no longer like just because I once invested time and money in them or because I could donate the finished project. I’d rather let go of the supplies now and let someone else have the enjoyment of making something they love. The other truth is, I really don’t need all this stuff.

Of course, mistakes happen and directions change, but the biggest lesson I’ve learned here is to trust my instincts and when in doubt — don’t.

xoxo,
Sandra

Linking up with Amanda Jean at Crazy Mom Quilts.


Finished: reusable unpaper towels tutorial

Have you seen the rolls of reusable unpaper towels on Pinterest or Etsy? They’re a great way to help protect the environment by not using paper, and you can show off some cute fabric. Over time, this eco-friendly version will probably turn out to be cheaper than the tree-made variety with their continued use, as long as you don’t try and scrub a grill grate or other rough surface with them.

DSC_0024


Want to make a set of your own? Sure you do! Here’s how:

Supplies: (enough to make 12 towels)

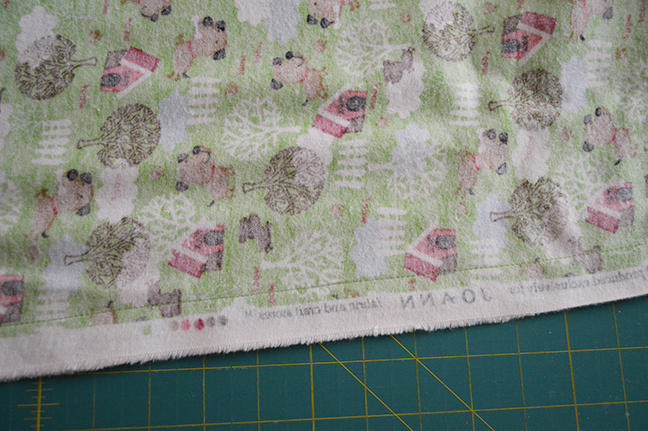
  • 1 1/8 yds. quilting cotton or flannel (If you use flannel, you may need a little more since it shrinks more than quilting cotton.) You can do all the same fabric, use one of each from your favorite collection or mix it up with a patchwork version.
  • 1 1/8 yds. terrycloth* (You can also use the inside part of an old towel; how many you’ll need will depend on how much is still usable.)
  • 48 sets of plastic snaps (24 male, 24 female) I used Kamsnaps, a wonderful company that uses proceeds from their sales to help rescue animals. You can even get the snaps in fun shapes like flowers or hearts.
  • Snap pliers (Again, I used Kamsnaps, but you can also buy these and the snaps at a big-box craft store)
  • Soluble marker (optional)
  • Awl
  • Thread
  • Rotary cutter, mat, ruler
  • Scissors
  • Empty paper towel roll

Start by pre-washing ALL your fabric in hot water with a color-catcher, if necessary. This is absolutely essential if you want your towels to stay flat and nice looking. Quilting cotton and terrycloth shrink at different rates, and pre-washing helps keep them the same size in subsequent washings. It also removes any sizing chemicals used by the manufacturer.

I like to serge the cut edges of my fabric so I don’t wind up with a tangled mess of threads to cut off. I put the blade down first so I don’t cut the fabric by mistake.

Next, iron both sets of fabrics as smoothly as possible. You can use spray starch if you think it helps your cutting accuracy; I didn’t bother. These towels are going to clean up spills and messes, so it’s not a time to worry about perfection.

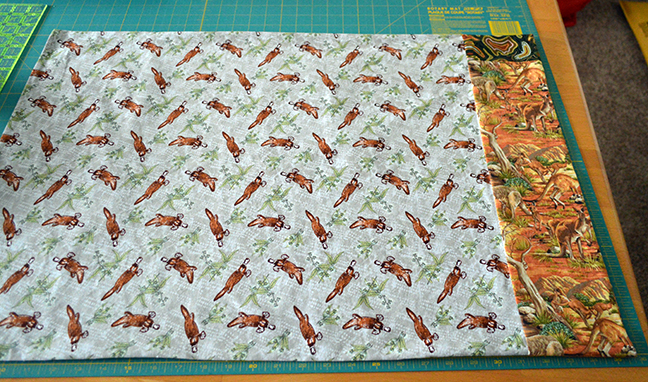
Starting with the quilting cotton, fold the fabric in half, lining up the selvages; trim them as close to the selvage edge as possible. Then trim the cut-side edges so that you have 1 yard of fabric. Subdivide and cut both sets of fabric into 12 12-inch squares. Be prepared for all the terry fuzz that will go flying all over your cutting surface.

Note: A standard American paper towel is an 11-inch square, and while some quilting cotton is 45 inches, allowing you to get 12 12-inch squares from a yard, a lot of it is only 42 or 43 inches, especially once you cut the selvages. You can either cut 12 equal pieces, which is what I’d recommend, or make scrappy versions with the leftovers. That’s easy to do with the quilting cotton, but the terrycloth? Not so much. (Don’t ask me why I know this.) I say close to size is good enough. The important thing is to have the cotton and the terry match in size, but even with that you can fudge a bit since the terry stretches.

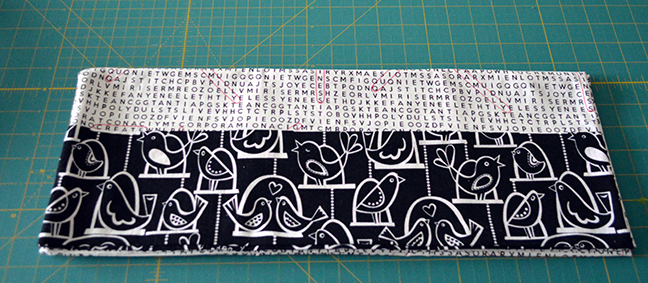
Place one square of the quilting cotton, right-side down, on top of a square of the terrycloth. Pin like crazy to help reduce any shifting while sewing. Mark the spot for an opening on one side that’s large enough for your hand to fit in.

DSC_0013

Stitch all the way around the edges using a 1/4-inch seam allowance. Reinforce the starting and stopping points with a few back stitches as shown at the top of the photo below.

DSC_0015

Clip the corners and any excess terry that stretched/shifted while stitching.

DSC_0016

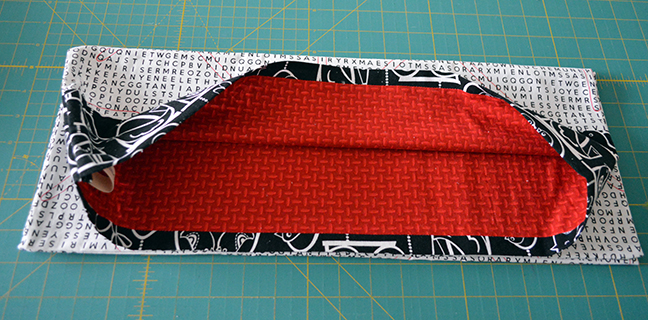
Turn the fabric right-side out and poke the corners with a chopstick or other pointed item, being careful not to go through the fabric. (Again, don’t ask me how I know this …)

DSC_0017

Roll the edges in your fingers to get the seams as straight and close to the edge on each side as possible. Press each side as you do this keeping your fingers out of the way. For the side with the opening, press the fabric down then clip in place, making sure that the edges align evenly. On the cotton side, sew 1/8-inch away from the edge, closing the opening as you go. Here’s a scrappy version I made with some leftover pieces:

DSC_0022

After you’ve made all 12 towels, it’s time to install the snaps. The Kamsnaps website has video if you need help, but it’s pretty easy. On the top, using a water-soluble pen, mark a spot in each corner that’s 1-inch from the edge on both sides. If you’ve used different fabrics and care about the order they’ll come off the roll, now is the time to arrange them in the order you prefer.

DSC_0020

Take the awl and poke a hole through all the layers in either the top or bottom mark on the far edge (the one that comes off the roll first), then place the masculine side of the snap through the hole, with the rounded flat side on the quilting cotton side. Place a masculine cap on the terrycloth side and slide the rounded flat side into the plier base. When everything’s aligned, give it a good squeeze to set the snap.

Place another masculine snap in the spot directly above or below the first snap (not diagonally across). If your fabric has a direction, pay attention to which side you place the snaps, since they need to be all in the same direction to work. On the opposite side, place a feminine snap in each of the remaining spots, also with the flat edge on top.

For your second towel, install four more sets, this time putting the rounded flat cap on the terrycloth side in all four places. Make sure your feminine side snaps are on the edge that connects to the masculine side on the first towel, so you’ll be able to snap them together.

How I managed to get all the right snaps on in the correct places on all my towels without a single mistake, I’ll never know. Here’s a look at the masculine side snap all installed.

DSC_0021

Note: I only used four snaps per towel, but I have seen sets that use six. The extra snap does make the edges flatter, but I didn’t think it was worth it. (See note about scrubbing spills above.)

Snap your towels together and roll them onto an empty paper towel roll. Then stand back and admire your work!

DSC_0025

These towels aren’t as cheap as a roll of paper towels, to be sure, but they are a whole lot cuter. It did take me a few days to work up the nerve to use them, but now I can’t imagine using anything else. I only use the paper version for things like toilets or something that would stain badly.

Speaking of stains, when I wipe up a food spill, I rinse the towel out immediately and then use a little dish soap, rubbing till the stain is as out as I can get it. I then wring it dry with my hands and let it air dry or throw it in the laundry basket, depending on how dirty it was. I know my set won’t stay bright white for long, but I’m OK with that.

I made a jumbo roll of 18 towels, and with rinsing/air drying, I haven’t gotten to the end of the roll yet. When they get too gross to use, out they’ll go and I’ll make new ones.

*A note about terrycloth. I made most of my set using terrycloth yardage. It’s thinner than the terry found on bath towels and a lot easier to cut with a rotary cutter. I did use some less than new hand towels on a few of these and would do so again rather than throw the towel away. However, there is a lot of waste with the regular towel, so bear that in mind before you cut.

Have fun making a set of these. I have a feeling they’ll be pretty addicting.

xoxo,
Sandra


Finished: flannel fleece blanket

I haven’t had too much time for sewing this month, but I managed to finish a flannel version of my reversible fleece blanket. Much as I love working with fleece and appreciate its warmth, it can be a little expensive. Flannel is a great alternative when you’re pinching the pennies.

If you need a last minute gift, you can make this in just a couple of hours. Seriously. I’m not fast at this stuff, and I can do it in that amount of time.

It all began with this too adorable fabric I spotted one day in Joanns. What I love is that it’s gender neutral, and since I’m adding this to my charity stash, I like to make things that will work for anyone who receives it.

DSC_0054Because there’s a difference in width between fleece and flannel, i.e., fleece tends to be 54 inches wide and flannel 44-45 inches wide, it’s not the same 1:1 ratio as on the reversible version.

When I make this using fleece on both sides, I buy two yards of each. For the flannel version, I buy 3 yards of the flannel and 1 1/2 yards of the fleece, since I’m making it for a young child. It should finish at approximately 54 inches square. Cost is about $20 or less, with all the sales still going on.

I find the easiest method is to be double the amount of flannel, seam it in the middle and then cut to size with my rotary cutter. I save the leftovers and coordinate them for a simple patchwork version. While piecing the flannel, I hide the selvage by lining up the edge of my presser foot on the white band and sew a one-inch seam.

DSC_0063Here’s the backing fleece. I put it right-side down on my bed, and once I’ve got my top piece sewn, pressed and cut to size, I’ll layer to the two pieces together and pin them.

DSC_0061Next it’s onto the serger to sew the pieces together and clean off the edges in one shot. (Note: if you have a label you want to put on the back, don’t be like me and forget every time until after the two pieces are serged together. You can still add it, but it’s easier to do it now.)

DSC_0065OK, I had to show a close-up. I’m not even a dog person, and I can’t stand how cute this is. Love it.

DSC_0067The last step is binding, which is a pretty basic quilt binding that I did with the solid red flannel. You can find the steps on the original tutorial. Since I forgot to add the label on the back, I clipped the edges of the label with pinking shears and sewed it after I attached the the binding to the front, making sure that the binding didn’t cover it when sewing it down on the back.

Here’s the finished product:

DSC_0068And the back:

DSC_0069DSC_0070Here’s hoping this blanket will keep some little boy or girl very warm soon.

Happy holidays, everyone. I hope your season is blessed, merry and bright!

XOXO,
Sandra

Finished: The Atomic Apps Quilt

I just can’t begin to tell you all how excited I am to share with you my finished Atomic Apps quilt. This is the one where I served as a pattern tester for Kati at from the blue chair, with its design based on a drawing made by her six-year-old daughter.

atomic_appsKati did a great job with the pattern. In fact, I’d say it was one of the fastest tops I’ve ever finished. The straight-line quilting, however, not so much, but that’s OK, because I’m in love with how it turned out and was the perfect thing for my 1950s-inspired look.

front-detailA serendipitous element occurred when I had to buy more Kona medium gray. At the time, I didn’t know how much variation there is with Kona dye lots and wasn’t sure I wanted to proceed until I had enough to make the top from the same lot.

But I decided to go with it, and I’m so glad because I think the variation makes the top even more interesting.

Here’s a look at the back, which I kept pretty simple and with a focus on the inspiration fabric:

finished backBelieve me, the middle isn’t that wonky, it’s just my bad camera angle. Although if it were, it would go with the front.The batting was some Warm and Natural that I had on hand. Not my first choice, but it was actually pretty easy to quilt on, and the price was right. I made the scrappy binding with some of the leftover scraps.

I can’t resist adding one more detail shot, just for fun and a little self-promotion:

finished back2If you’d like to make your own Apps quilt, you can purchase the pattern at the following links:

http://www.craftsy.com/user/1036910/pattern-store

https://www.etsy.com/shop/fromthebluechair

I’m linking up with Amanda Jean at Crazy Mom Quilts for Finish It Up Friday — my first time ever! Have a great weekend, everyone.

XOXO,
Sandra


WIP Wednesday, a finish and a giveaway: my Atomic Apps quilt top

You may recall I agreed to serve as a pattern tester for Kati at from the blue chair, making blocks for her new pattern, the App quilt. She just released the final version of the pattern, so be sure to head on over to her blog where she’s offering the pattern at a sale price along with a giveaway on her Instagram page!

(You can buy the pattern on her Craftsy page here, and on Kati’s Etsy store here.)

Here’s my version — the Atomic Apps Quilt! 05-27-14a

This pattern was quick and easy, and Kati’s instructions were very clear. I made this top from eight-inch blocks to show off the Michael Miller Fifties Kitchen fabric to its full advantage.

05-27-14bThe basting was pretty easy on this one, using Sharon Schamber’s method. I decided to do straight-line quilting with vertical lines spaced a half-inch apart, which is taking me awhile. Line after line, I sometimes wish I didn’t love the look so much.

quilting1Airhead me forgot to take a photo of the back, but I’ll be sure to show it to you once I get the quilt finished and bound.

OK, now for the best news. Kati has authorized her testers to give away a copy of the final pattern, so now you’ll have more chances to win – woo hoo! Just leave me a comment saying what kinds of fabric you’d like to use to make your Apps quilt. I’ll pick a winner from a random drawing Monday, June 16.

Since this quilt technically isn’t finished, I’m going to link up with Lee at Freshly Pieced for WIP Wednesday.

WIP_Wednesday

Finished: striped four-patch pillow cover

OK, I have to admit, as much as love sewing and crafting, there are just some days that I feel like calling this blog “One million mistakes …”

On those days, I could take every last scrap of fabric, yarn and floss in my stash, not to mention my extensive collection of patterns, books, needles, scissors, thread, a sewing machine, a serger, a brand new fabric cutter, and my $15 iron and throw them all in the muddy, polluted river that’s about two miles down the hill from my house.

So imagine my surprise when yesterday afternoon I was able to finish a pillow cover with fairly minimal effort and only a few mistakes, none of which were irreparable.

This does not happen in my universe. Ever.

The story begins with a pillow I wanted to recover so I could get rid of the awful, 20-year old fabric on it that hasn’t been my taste for probably 19.9 of the years I’ve owned it.

DSC_0004I mean, seriously, what was I thinking back then?

So, I took some of the leftover fabrics from the plus-sign quilt I’m making for my bed (that is if I ever finish piecing enough leftovers to make the ginormous back) and threw them into the fancy new cutting machine I paid way too much money for to see how well it worked.

Even without using the correct size mat this baby cut perfect 2.5-inch strips. Hmmm. Guess that’s why they charge so much for the darn thing.

Then I sewed a bunch of strips together, decided it looked boring, so I cut them in half, turned one set and wound up with a pretty cool striped four-patch block.

DSC_0002I knew I wanted to do some straight-line quilting on this puppy, so I got out a few scraps of leftover crappy batting and zigzagged them together because I was too cheap to cut a single piece of the good stuff.

Why use the good stuff if you think you’re only going to ruin it by ripping out 9,000,000 stitches?

I was also lazy and basted the layers with a few straight pins. Didn’t get stuck. Not once, though next time I’ll probably do things the right way just to be safe. Easier to cheat on a small piece.

Here’s a photo of the front and shock of all shocks, for my second time quilting with this method it turned out pretty well.

DSC_0009If my photography skills were better you might actually see the quilting. At least I rememberd to take a photo of the back:

DSC_0010Not too shabby. Definitely not perfect, but good enough to make me quite happy. For a recovering perfectionist, this is saying something.

I won’t bore you with all details on how I made the envelope back and finished things, other than I was able to use some more of the black toile I recycled from an old comforter. I did serge around the edges for a little extra protection when I wash this. A quick press and voila!

DSC_0015And the back:

DSC_0016A couple more photos, because the natural light was great this afternoon.

DSC_0024DSC_0025Before I go, I want to say thank you to everyone who signed up for Stephanie‘s and my Supernova Friendship Block Swap, as well as to my new followers. You guys are so great to follow my shenanigans here.

We’ve got a few more singles to pair up, and then we’ll be set. If anyone still wants to join the fun, we’d love to have you, but we’ll ask you to find your own partner.

Do what I did. Make some comments on someone’s blog you admire and when they email you to thank you, take a chance and see if they’d be willing to participate. With four kids at home, I totally expected Stephanie to say no and was thrilled when she agreed. She is also the one who thought it would be a great idea to open our swap up to others and has gathered the terrific prizes we have so far.

Thanks, Steph, for being my new quilting friend. I can’t wait to get to know you better.

I hope you all have a wonderful Mother’s Day. I’ll be thinking of my sweet mommy who got me started on this crafting journey many years ago. Thanks, Mom.

XOXO,
Sandra


Finished: plus-sign quilt top

I am very happy to share my finished Napoleon plus sign quilt top! This quilt is large enough to cover my bed, and it’s wide enough that it will hide the box spring without a bed skirt.

Getting photos of this hasn’t been easy. Every time I had a chance to grab photos, the weather wouldn’t cooperate. When it was nice out, I didn’t have time. So, I event though I wanted to share more process photos with you guys, it wasn’t meant to be.

As you can see on the photo below, this thing is a monster. It’s 109 1/4×96 3/4 inches, which is not only ample enough, it also won’t matter once it’s washed if it shrinks a bit.

front-2Here’s a cropped shot so you can hopefully see the fabrics a bit better, even if the perspective is a little weird. The light was too perfect this afternoon to miss.

DSC_0017Course, it was also windy …

DSC_0019DSC_0020DSC_0021So much for my outdoor photos! Don’t worry, I have an idea for a straight shot that I’ll take once it’s quilted and bound.

What I love about plus sign quilts is that they’re a great way to show off fabrics and you can size them to suit whatever yardage you have on hand. At six inches for the top/bottom squares, these are bigger than most, but I think it worked well for large-scale prints. Next time, I’ll probably do something smaller with solid fabrics.

As for quilting, I plan to do something with curves to offset all the straight lines, probably a large stipple. Anything fancier would really be lost. Another idea might be to emphasize the plus signs and do some echo-quilting in each one. I could also do basic straight lines, too.

Since this isn’t a full finish, I’m going to link it up with Lee at Freshly Pieced for WIP Wednesday.

WIP_WednesdayXOXO,
Sandra