
Excuse me, is anybody still out there?
I know, I’ve been gone awhile. Truth is, I lost my blogging mojo. Seems like a lot of other bloggers have too. It’s modern life, right? We’re all a little too busy and stressed, no matter what our station is. And since blogging isn’t my full-time gig, it’s all too often the first thing to go when I’m feeling overwhelmed.
So, to return (hopefully) to a more regular schedule, I’ve got a tutorial for you, one that’s quick and easy, takes advantage of pre-cuts or die-cuts, and is perfect for a gift or to donate to a deserving charity. I’m calling it the Modern Lily Pad quilt, and you can customize it however you’d like. Finishing at 54×66 inches, it’s a nice lap size.
 Materials:
- Inspiration/background fabric: 2 1/2 yds. (based on at least 42-inch width).
- Eight additional fabrics for lily pads: enough to make 160 (2 1/2-inch) squares. (If you want all your pads to have the same eight fabrics, you’ll need 2 WOF strips at 2 1/2-inches wide or 3 half-width strips at 2 1/2-inches wide if using fat quarters. You can also use 2 1/2-inch pre-cut strips.)
- Batting: a 60×72-inch piece
- Binding: 1/2 yard or use any leftover strips from your lily pad pieces for a scrappy look.
- Backing fabric: 3 yards (based on piecing the back together)
- Thread
- Basic quilting supplies: rotary mat, cutter, rulers, scissors, sewing machine
- Optional supplies: die-cutter
Start by cutting 5 (6 1/2-inch) WOF (width-of-fabric) strips; then sub-cut those into 25 (6 1/2-inch) squares for the lily pad rows. Use the leftover fabric on the last strip to cut 20 (2 1/2-inch) squares for the centers of your lily pad.
Next cut 6 (6 1/2-inch) strips down the length of the remaining fabric for the sashing rows. If your fabric is directional, or you don’t like cutting lengthwise (like me) you can cut 8 (6 1/2-inch) strips across the WOF and then piece those rows. The two additional rows divided into thirds will be enough to piece.
Once you’re done you should have 6 rows that measure 6 1/2-inches wide by 54 1/2-inches long. Be sure to pay attention to directional fabrics when you cut.
There are 20 lily pad blocks, so you’ll need 20 (2 1/2-inch) squares of eight different fabrics if you want each block to look the same. If you want to go even more scrappy, you’ll need a total of 160 (2 1/2-inch) squares.
I began with this cute frog fabric that I’ve had in my stash for far too long. I loved the bright colors and knew it would be perfect to help me choose my additional fabrics.
 Here’s a closeup:
 I chose the same eight fabrics for each block and used my Accuquilt Go! Cutter to cut them into 2.5-inch strips.

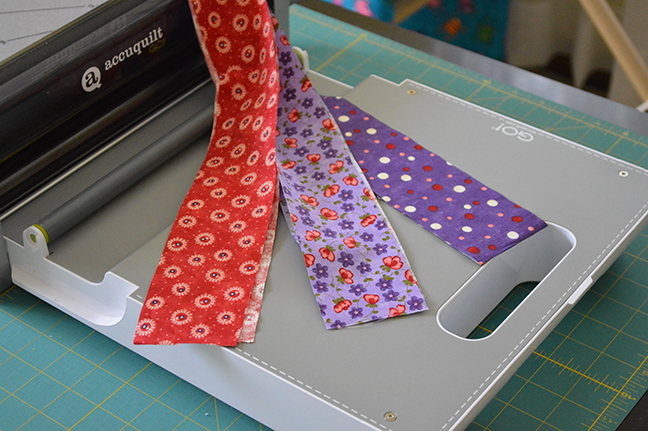
 Next, using the same die cut, I cross-cut my strips into 2.5-inch squares. So easy!
To make the blocks, I started by sewing three squares together using a 1/4-inch seam to make a row, then sewed three rows together. I pressed my seams open, but you could press to the side (alternating sides and couching seams) if you prefer.
Each block had one square each of my eight fabrics; the middle was the background fabric. I also varied the placement of the fabrics. Here’s an example with a finished block: Tip: I could have taken a photo of my design wall to remember my order, but since I forgot, instead I worked row-by-row, going from left to right, always putting the second piece on top of the first and sewing a scant 1/4-inch seam. I chain pieced the three rows keeping them in order and then went back and added the third square to each row.
You also don’t have to be that fussy about it. I just wanted a scrappy look. It’s really up to you how how the nine-patch blocks look; just make sure to keep your inspiration fabric in the center. Otherwise, have fun and don’t worry too much about where the remaining fabrics go.
Tip: for a cute idea, you could fussy-cut the center squares, something I might do the next time I make this!
After you make all 20 nine-patch blocks, sew one nine-patch block to one of the 6 1/2-inch squares of background fabric. After I did this, I put them up on my design wall to see where I wanted each block to go.
Once I was happy with the placement, I could sew the blocks together by row, adding the last background square at the end:
 When you have the lily-pad rows completed, they should measure 54 1/2 inches. Make sure your sashing rows measure the same. Then it’s just a matter of sewing all the rows together, starting and finishing with a sashing row. Your final quilt top looks like this:
 To make the back, I used up the leftover frog fabric and 2 1/2-inch squares in a random improv fashion, about 3 inches larger than the top on all sides. (I forgot to take a photo, so here’s a closeup of the finished back.)
 Now it’s just a matter of basting and quilting, using your preferred method. I pin-basted this on my sewing table using Denali clamps. I also forgot to take photos until after I was well into the quilting, (no brain that day) but here’s a post-process shot:
 Essentially, these work the same as when you tape the back/batting, etc., but stay much more secure. They come in a package of 14 in assorted sizes. I bought mine from Amazon, who doesn’t seem to carry them anymore, but you can buy them from Sears. Well worth the investment.
For the quilting, I was going to do a simple stipple all over, but my machine’s tension was badly off and multiple attempts to fix it didn’t work. Thankfully, it still makes a good straight stitch, so I opted instead to do a wide cross hatch.
 The key thing on this type of quilting is to start and end well. I first started by using painter’s tape, after lining up my ruler on the 45-degree line along the top of the nine-patch blocks.
 It helps to decide if you’re a righty or a lefty when placing the tape, though that can change in order to not have so much bulk under the machine.
 The problem with this method is the tape doesn’t always stick too well, especially after multiple uses. I found the Hera marker to work much better.
 Ok, I have a confession to make here. I didn’t mark the lines all the way through. When it came to the blocks, it was pretty easy to line up to the next point on the diagonal. The 6-inch space between blocks was a little tougher, but I have a pretty good sense of alignment on these things and it seemed to work out.
If that bothers the perfectionist in you, by all means, mark all the way through. But as you can see below, the stitching is nicely aligned and not marked saved me a lot of time. In fact, I found I did better going by eyesight than by the marked line.
When you’ve finished quilting, trim the excess batting and backing from your quilt, squaring it up as you go. A large square ruler placed in the corner is a handy way to do this.
Another confession: I do trim my quilts before binding them, but I don’t worry if they’re not perfectly square, especially if it means cutting off too much to get it even.
For the binding, cut 6 (2 1/2-inch) strips of your binding fabric. Seam them together (either with straight or bias seams) to make one long continuous strip, at least 250 inches in length. I sewed mine with straight seams, which you can see on my tutorial for an easy fleece blanket, but you can see how to sew them on the bias here. You can also see how to attach it to your quilt (both front and back). I like to attach mine starting at the bottom.
Tip: Once you have your binding made, you can wrap it around a ruler that’s not in use and slide it off to keep it untangled until you’re ready to put it on your quilt.
 Attach the binding, throw it in the machine for a wash/dry (many charities will only accept washed quilts; I wash mine using Dreft baby soap) and you’ve got a great quilt for a deserving someone. That person might even be you!


Linking up with Amanda Jean at Crazy Mom Quilts for Finish it up Friday.
XOXO,
Sandra
