My good friend Stephanie, who blogs over at Late Night Quilter, asked me if I’d like to participate in the Fabri-quilt new block blog hop by designing a block with their new line of solids.
 Naturally, I jumped at the chance to join the more than 60 bloggers who over four days this week have each designed a new 12-inch finished block and provide a tutorial for their readers. Of course, I’m running late, since this is the last day of the hop. But better late than never!
Fabri-Quilt generously donated fat eighths in each of the following six colors, aka the Watermelon Summer palette from the Prairie Cloths solids line: (from top left to right: chartreuse, turquoise, coral, aqua, lapis blue and white). The blocks will be made into charity quilts.
 As anyone who has seen my modern quilt Pinterest board knows, I’m a huge fan of plus-sign quilts. They’re quick, easy and make a bold impact. So, while scouring the Web for ideas, I found an image of the flag from the country of Georgia, and knew I had found my inspiration.
 Here’s my interpretation, using the lush Fabri-Quilt colors:
 What I like about this block is that it’s easy and is great for using up scraps. You can make it in solids, as I have here, or you could go scrappy with prints. But now that I’ve gotten my hands on this fabric, I can definitely say I’ll order more of it in the future.
To make the Georgian flag block, here’s what you’ll need:
Six fat eighths, each a unique color, cut as follows:
Lapis blue — cut two 2.5-inch strips; subcut one strip to 2.5×12.5 inches, subcut the second strip into two pieces, each 2.5x 5.5 inches
Chartreuse, turquoise, coral, aqua — cut one 1/5-inch strip; subcut to get 2 pieces of each color 1.5×1.5 inches and 1 piece that’s 1.5×3.5 inches
White: cut six 1.5-inch strips; subcut to get 16 squares that are 1.5×1.5 inches each, 8 strips that are 1.5×5.5 inches each and 8 strips that are 1.5×3.5 inches each.
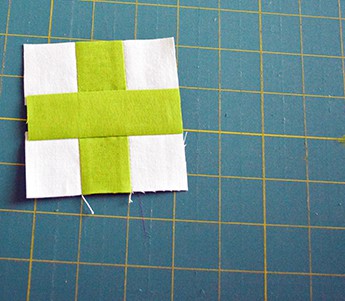
Begin by sewing a white square to each side of a colored 1.5-inch square ensuring you have an accurate 1/4-inch seam. Press your seams toward the middle solid. When complete, your finished strips should measure 3.5 inches.I like to measure my strips as I go, just to be sure I’m on the right track. Sometimes I oversize them, as you can see below, and then trim. Once you’ve done this, proceed with all the remaining 1.5-inch squares.
 Next, take one of the strips you just made and sew it to the same color 3.5-inch strip. Press toward the single strip. Repeat with the remaining three-square strip in the same color and attach it to the opposite side of the single strip. Press toward the middle. Your completed plus-sign should be 3.5-inches square.
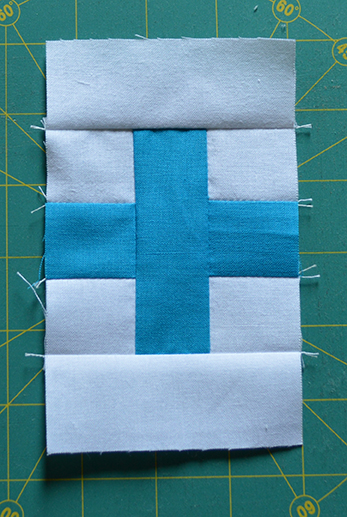
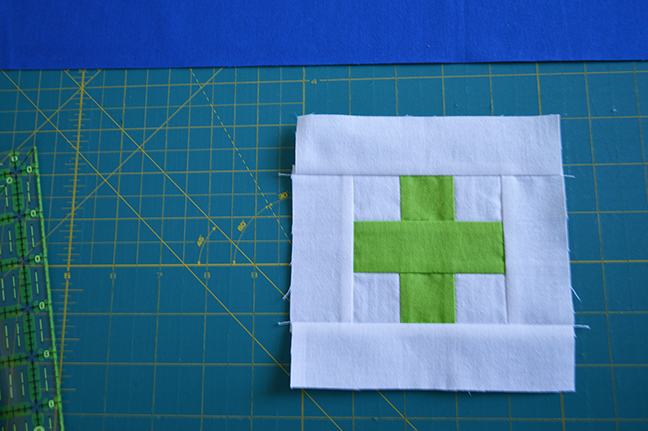
 Sew a 1.5×3.5-inch strip of white on each of two sides of the plus sign, and press toward the white strip. Follow that by sewing a 1.5×5.5-inch strip to the remaining sizes; press toward the white. Your finished piece should be 5.5-inches square. Repeat this process with all four colors.

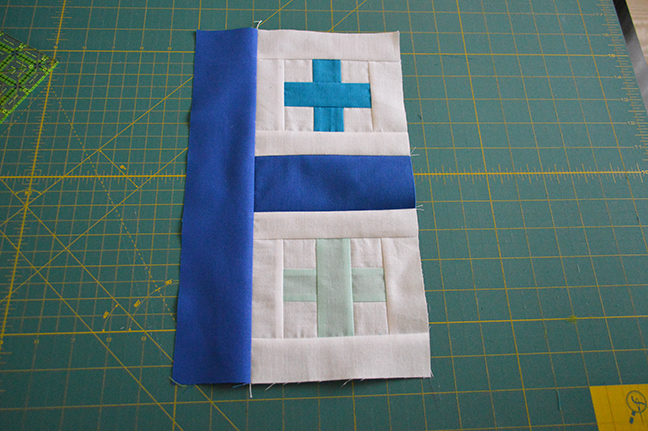
 Take one of the 5.5-inch strips of the dark lapis fabric and sew it to one of the plus sign squares; press toward the lapis, then sew the other side to another plus sign as shown above. Press toward the lapis. Repeat this process with your remaining plus blocks.
 Sew the remaining 12.5-inch lapis strip to one side of one of the two pluses you’ve just sewn; press toward the lapis.
 Do the same thing with the other side and you’re all done!
 A note about the fabric: some of the bloggers said they had a lot of shrinkage when working with the fabric, either during pre-wash or using a steam iron. I’m not a pre-washer, so this didn’t happen for me. I do use steam, but again, not a problem. Just be sure to check your measurements throughout and you should be fine.
Others had trouble with the colors bleeding, especially the red salmon color. I didn’t have that issue, but to be safe, you can put a small piece in a glass of hot water to see if it runs. If it does, it’s time to pre-wash.
But wait, there’s more! There’s even a giveaway! You could win a 1/2 yard bundle of lovely palette by visiting each day’s blog host. And if you want an easy way to view the blocks, I hear some of the bloggers have created Pinterest boards just for the swap.
Monday, August 31st
Host – Yvonne @Quilting Jetgirl
Kelly @Quilting it Out
Martha @Once a Wingnut
Irene @Patchwork and Pastry
Cassandra @The (not so) Dramatic Life
Andrea @The Sewing Fools
Bernie @Needle and Foot
Silvia @A Stranger View
Wanda @Wanda’s Life Sampler
Sandra @Musings of a Menopausal Melon
Vicki @Orchid Owl Quilts
Jess @Quilty Habit
Diana @Red Delicious Life
Chelsea @Patch the Giraffe
Margo @Shadow Lane Quilts
Renee @Quilts of a Feather
Tuesday, September 1st
Host – Cheryl @Meadow Mist Designs
Josi @Avocado Quilts
Stephanie @Quilt’n Party
Cristy @Love You Sew
Sarah @Sarah Goer Quilts
Shelly @The Carpenter’s Daughter Who Quilts
Jayne @Twiggy & Opal
Sharla @Thistle Thicket Studio
Adrian @Making It – Family Food Quilts Crafts
Julie @Pink Doxies
Sarah @123 Quilt
Jane @Jolly and Delilah Quilts
Carrie @The Zen Quilter
Wednesday, September 2nd
Host – Stephanie @Late Night Quilter
Hannah @Modern Magnolia Studio
Cindy @Stitchin At Home
Abby @Hashtag Quilt
Lisa @Sunlight in Winter Quilts
Carrie @Chopping Block Quilts
Eleanor @Cat Approved Quilting
Brianna @The Iron and Needle
Tish @Tish’s Adventures in Wonderland
Jan @The Colorful Fabriholic
Sarah @Smiles Too Loudly
Beth @Cooking Up Quilts
Leanne @Devoted Quilter
Liz @LizzyClips Design
Kim @Leland Ave Studios
Kitty @Night Quilter
Thursday, September 3rd
Host – Terri Ann @Childlike Fascination
Helen @Midget Gem Quilts
Jinger @Trials of a Newbie Quilter
Anja @Anja Quilts
Kathryn @Upitis Quilts
Mary @Quilting is in my Blood
Emma @My Handmade Home
Francine @Mocha Wild Child
Dina @Living Water Quilter
Deb @The Farmhouse Quilter
Lori @SewPsyched!
Amy @13 Spools
Denise @CrafTraditions
Sandra @The Bias Edge
XOXO,
Sandra
Love your block. Great idea.
Thanks so much! I can’t wait to try it out with scrap prints.
Your block adds up to fun X 5 time two! Five plus signs and five colors. It is modern and has impact. Congrats
Thanks so much, Dena. Glad you liked it!
Great Block – Great Hop, had a lot of fun on these. crystalbluern at onlineok dot com
Aren’t all these blocks great? Thanks so much for the kind words on mine!
I absolutely love your quilt block! You did an amazing job in creating it and writing the tutorial. I have added it to my to make list and think it will make a remarkable scrap quilt for one of my nephews. Thank you for sharing and have a wonderful creative day!
Aww, Brenda, thanks so much. You’ve made my day!
Plus quilts always make me smile. Great block, love how you used the flag as your inspiration.
Thanks, Diana – glad you liked it!
Thank you Sandra for your plus block design and the great tutorial to create it. I just love it!
Thank, Lu. You’re more than welcome!
I like the scale of your block idea. It’s IS perfect for using up scraps, but I wonder about using prints in the backgrounds while keeping those mighty plus signs all the same. Hmmmm….Thanks for sharing.
I hadn’t thought of that, but I bet with low-volume prints it could be very cool. Thanks for stopping by.
This is so awesome! Love it! Would be great on a pillow also! Great job!
Thanks, Silvia! Glad you liked it.
That is such a fun block… On your note, I used to “loose” fabric when I first started out. I’m also a no-pre-wash-lots-of-steam” girl and I found that by pressing my seams open instead of to the side, I eliminated a lot of my problem. It’s a bit longer, but the effect is wonderful.
Thanks, Yanic. I’ll have to give that a try. I’ve certainly pressed seams open many times, but didn’t consider when I wrote this that it might help if a fabric has a tendency to shrink.
You are welcome. I used to always come short. By the time I was done with blocks, they were always 1/4 to almost 1/2 inch too small. Lots of trial and error on that one. 🙂
I love this block. I love it’s clean modern lines….and using different sizes of pluses adds a fun dimention.
Thanks so much for the kind words, Lisa!